Mastering the Cat Cow: How to Perfect your Cat Pose (Marjaryasana)
Mastering the cat cow flow is one of the best things you can do for your long term mobility. By focusing on the alignment of your Cat Pose (Marjaryasana) you are not just stretching, you are retraining your body to move with grace, strength and breath.
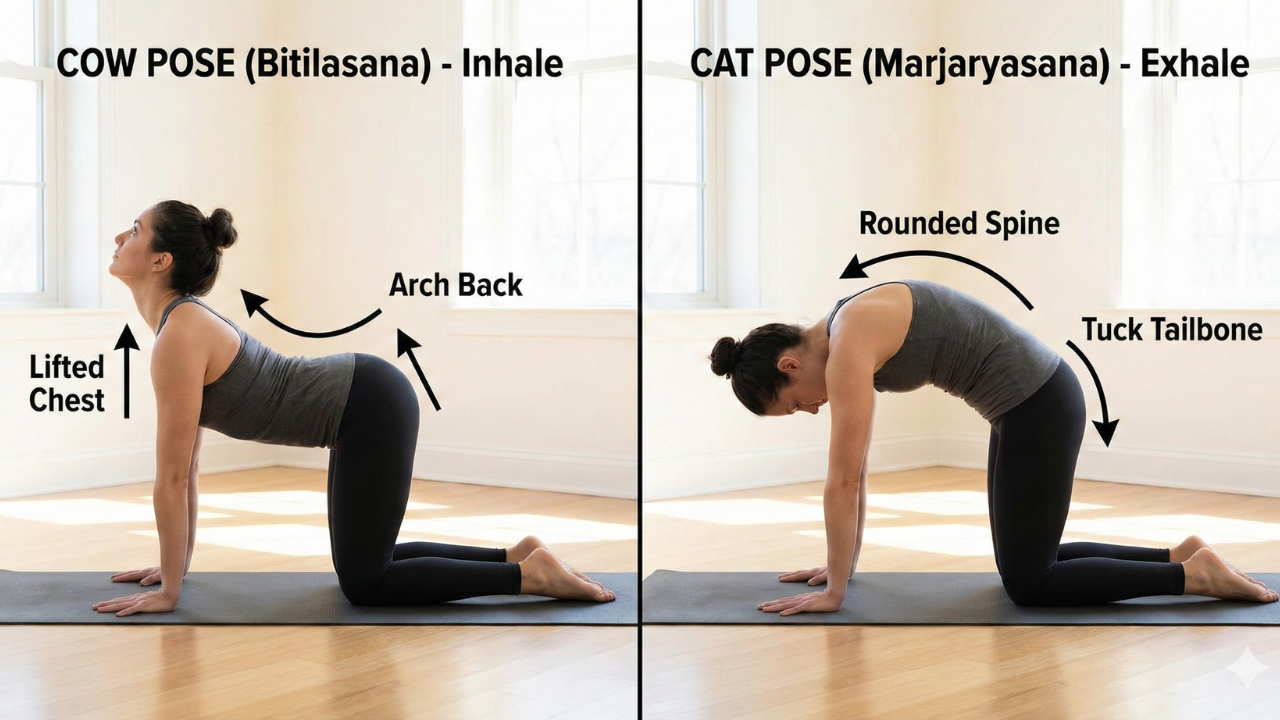
Table of Contents
Introduction
The “opening” stretch of Cow Pose, today we are focusing on its powerful partner Cat Pose (Marjaryasana). This gentle rounding of the spine is the ultimate reset button for your nervous system and the key to unlocking deep, hidden tension in your back. Let us dive into how you can master this foundational move to feel lighter and more mobile every single day.
Fortunately, the secret to a supple, pain free back, it starts with a simple, rhythmic movement known as the Cat Cow.
What is Cat Pose (Marjaryasana)?
In Sanskrit, Marjari means cat and Asana means pose. The name is a literal description, think of a cat waking up from a long nap and stretching its back high toward the ceiling.
While the cat cow flow as a whole is a dynamic movement, Cat Pose specifically is a “flexion” of the spine. It focuses on rounding the back, tucking the pelvis and creating space between the shoulder blades.
The “Quick-Start” Snippet: How to do Cat Pose
To perform Cat Pose correctly as part of your cat cow routine, follow these steps:
Start in a neutral tabletop position on your hands and knees.
Exhale deeply as you tuck your tailbone under.
Draw your navel toward your spine, rounding your back toward the ceiling.
Release your head, letting your gaze fall between your knees.
Press firmly through your hands to lift your spine higher.
Why the Cat Cow Flow is Essential for Health
The spine is the highway of the nervous system. When it becomes stiff or compressed due to stress and sitting, it affects everything from your energy levels to your digestion. Here is why the cat cow movement and specifically Cat Pose is a must have in your daily routine:
1. Immediate Back Tension Relief
Cat Pose targets the erector spinae, the muscles that run along your spine. By rounding the back, you provide a gentle stretch to these muscles that often become chronically tight from “desk slouching.”
2. Core Activation
Unlike Cow Pose, which is a stretch for the front body, Cat Pose requires you to pull your abdominal muscles in and up. This strengthens the deep stabilizers of your core, which in turn protects your lower back.
3. Stress Reduction
Because the cat cow flow is synchronized with the breath, it helps move the body out of “fight or flight” mode and into a state of relaxation. The rounding of the back in Cat Pose is naturally “introverted” and calming for the mind.

Step-by-Step: Mastering the Alignment
To get the most out of your cat cow practice, alignment is everything. Let us break down the Cat Pose into three sections.
The Foundation: The Hands and Knees
Before you round your back, check your base. Line up your wrists with your shoulders and your knees with your hips. Spread your fingers out and push down through the space between your thumb and pointer finger
This keeps the weight off your wrists.
.
The Movement: The Pelvic Tuck
The movement of Cat Pose does not start in the shoulders, it starts at the base of the spine. As you exhale, imagine your tailbone pointing down toward the mat and then forward toward your navel. This pelvic tilt is what initiates the beautiful curve of the back.
The Finish: Releasing the Neck
The final piece of the puzzle is the head. Many people hold tension in their neck during cat cow. In Cat Pose, let your head hang completely heavy. Your gaze should be toward your thighs or your belly button. This allows the cervical spine (the neck) to decompress fully.
Common Mistakes to Avoid in Cat Pose
Even though it is a foundational pose, it is easy to pick up bad habits. Watch out for these:
Shrugging the Shoulders: Do not let your shoulders “crunch” up toward your ears. Even while rounding, keep space around your neck by pressing firmly into the floor.
Forcing the Rounding: Never force your spine into a shape. The cat cow flow should feel like a wave smooth and fluid. Round only as far as your breath allows.
Holding the Breath: The “Cat” part of the flow is always paired with the exhale. If you find yourself holding your breath, back out of the pose slightly.
Modifications for a Comfortable Practice
Yoga is for every body. If the standard tabletop position does not work for you, try these:
For Sensitive Knees: Place a folded blanket under your knees for extra cushioning.
For Wrist Pain: Instead of flat palms, try making fists (knuckles down) or use yoga blocks under your hands to change the angle.
Seated Cat Cow: If you can not get on the floor, you can do this in a chair, Sit on the edge of your chair with feet flat, hands on knees. Exhale and round your back away from your knees, tucking your chin.
Conclusion
Mastering the Cat Cow flow is more than just a warm up, it is a daily investment in your long term mobility. By focusing on the intentional rounding of Cat Pose, you are giving your spine the space it needs to breathe, move and stay healthy. Yoga is not about reaching a perfect shape it is about listening to your body and finding ease in the effort.
it is especially effective in the morning to “wake up” a stiff spine after sleeping, or in the evening to release the tension built up from a day at a desk.
FAQs About Mastering the Cat Cow: How to Perfect your Cat Pose (Marjaryasana)
1. Is the cat cow flow good for lower back pain?
Yes! It is one of the most recommended exercises for gentle back pain relief. By moving the spine through its full range of motion, you help decompress the vertebrae and stretch the muscles that often feel tight from sitting. However, if you have a sharp or chronic injury, always consult a doctor first.
2. Should I inhale or exhale during Cat Pose?
In the cat cow sequence, you should always exhale during Cat Pose. The exhale helps you naturally contract your abdominal muscles, which allows for a deeper rounding of the spine and a better core engagement.
3. Why do my wrists hurt during this exercise?
Wrist pain is common if you are “dumping” all your weight into the joints. To fix this, spread your fingers wide and press firmly into your knuckles and fingertips. This creates a “clawing” action that protects the wrist. You can also try doing the pose on your fists.
4. How many repetitions of cat cow should I do?
For a daily reset, 5 to 10 slow, breath controlled rounds are perfect. It’s better to do five high quality repetitions with deep breathing than twenty fast ones without focus.
5. Can I do Cat Pose if I have a neck injury?
If you have neck issues, keep your head in a neutral position (looking down at the floor) rather than dropping your chin all the way to your chest. Focus the movement on your middle and lower back instead.
6. Is cat cow safe to practice during pregnancy?
Generally, yes! It is a wonderful way to relieve the back pressure that comes with pregnancy. Just be careful not to over stretch the abdominal wall during the “Cow” portion, focus more on the “Cat” rounding for comfort.
7. My knees hurt on the yoga mat, what should I do?
This is a simple fix! Place a folded blanket or a towel under your knees for extra cushioning. You can also double fold your yoga mat for that specific section of your practice.
8. How can we differentiate between Bitilasana and Marjaryasana?
Bitilasana is the Sanskrit name for Cow Pose (the arch/inhale), and Marjaryasana is the name for Cat Pose (the round/exhale). Together, they form the cat cow flow.
9. Can I do this exercise if I am not flexible?
Absolutely. In fact, this is the perfect pose for people who feel “stiff.” You do not need to have a deep arch or a massive round to get the benefits, simply moving within your own comfortable range will improve your flexibility over time.
10. What is the best time of day to practice cat cow?
While you can do it anytime, it is especially effective in the morning to “wake up” a stiff spine after sleeping or in the evening to release the tension built up from a day at a desk.