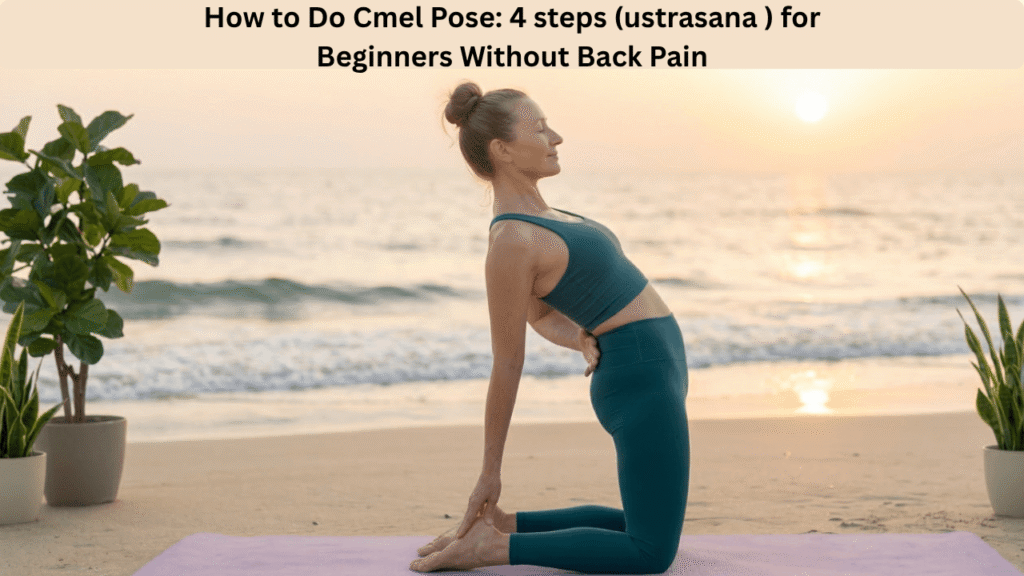
Learn how to Do Camel Pose (Ustrasana) safely. This beginner friendly guide focuses on alignment to prevent back pain while helping you build confidence and flexibility.
Introduction
Yoga is a powerful practice that offers a myriad of physical, mental and emotional benefits. However, certain poses can be intimidating, especially for beginners or those prone to back discomfort. One such pose is Camel Pose (Ustrasana).
It is a profound heart opening yoga pose that can significantly improve posture, increase flexibility and even boost self confidence. But the most common concern people have is, “How do I practice Camel Pose without hurting my lower back?”
If this is you, you are in the right place. In this comprehensive guide, we will break down how to do Camel Pose safely and effectively, ensuring you get all the opening without the ouch.
This tutorial is specifically designed to help beginners and anyone who has previously struggled with back tension during this pose.
Understanding Ustrasana: Why Camel Pose Can Cause Back Pain
Before we get into the step by step instructions, it is important to understand why this pose can sometimes lead to back pain.
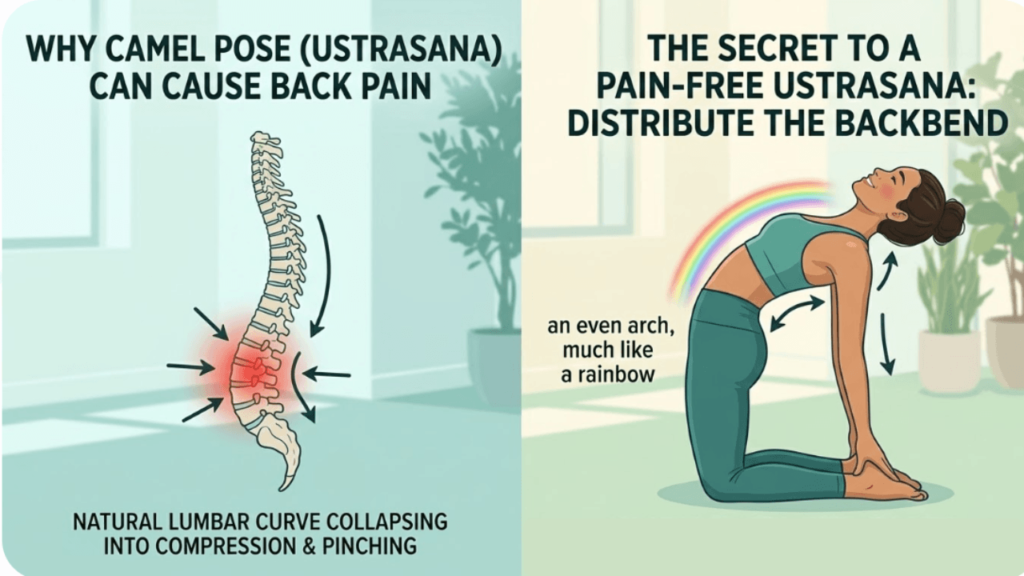
The human spine naturally has a slight curve in the lower back (the lumbar spine). In a deep backbend like Camel Pose, there is a tendency to collapse into this curve, creating pinching and compression. To prevent this, the goal is to create length and space before you go back.
The secret to a pain free Ustrasana is to distribute the backbend across your entire spine, especially the upper and middle back (the thoracic spine), rather than just bending from your lower back.
When you learn how to do Camel Pose correctly, you create an even arch, much like a rainbow, which supports your spine instead of compressing it.
Preparing for Ustrasana: The Safe Setup for Beginners
A successful, pain free Camel Pose begins with the right setup and preparation.
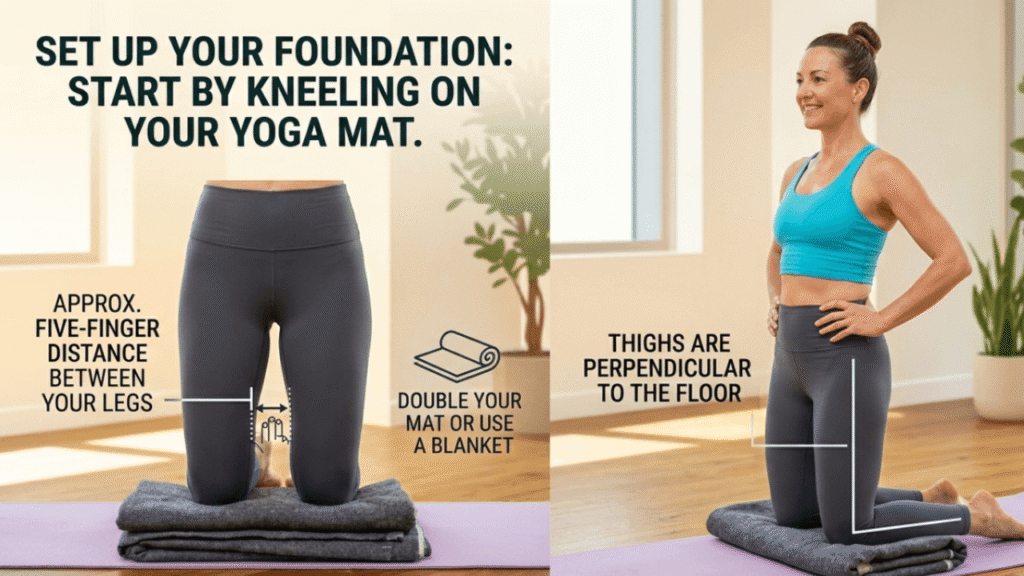
1. Set Up Your Foundation:
Start by kneeling on your yoga mat. Ensure your body is straight and erect. Your knees should be hip width apart, approximately a five finger distance between your legs.
Maintain a 90 degree angle between your thighs and the ground. If you have sensitive knees, a crucial tip is to place a soft yoga blanket or double your mat for extra padding. Protecting your knees is essential for maintaining proper alignment in Camel Pose.
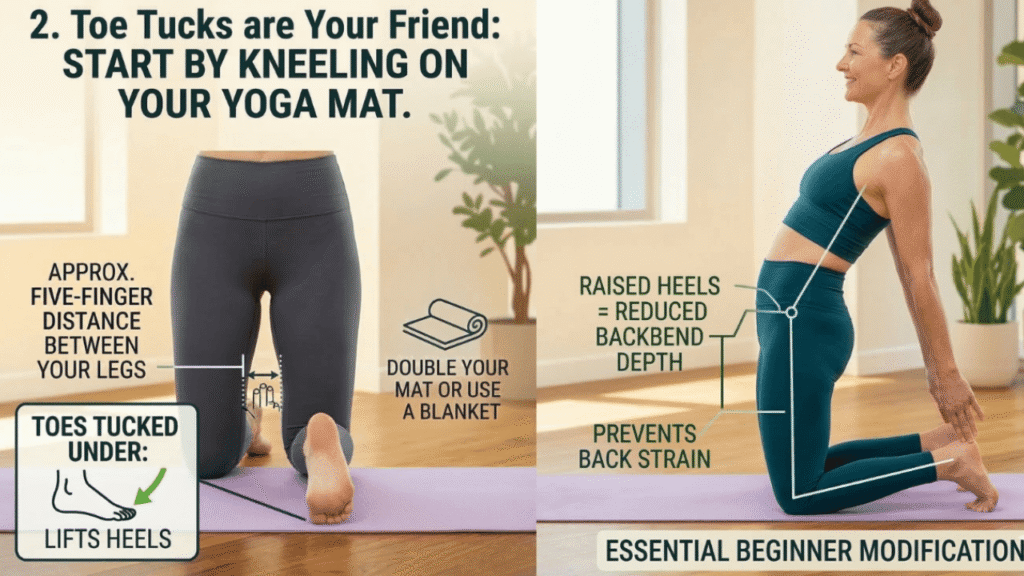
2. Toe Tucks are Your Friend:
For beginners, I highly recommend tucking your toes under. This lifts your heels, making them much easier to reach and significantly reducing the depth of the backbend, which can help prevent back strain.
It is an essential modification for those learning how to do Camel Pose.
Step-by-Step Guide: How to Do Camel Pose Safely
Now, let us move into the pose with a focus on safety and alignment.
Step 1: Create Spinal Length
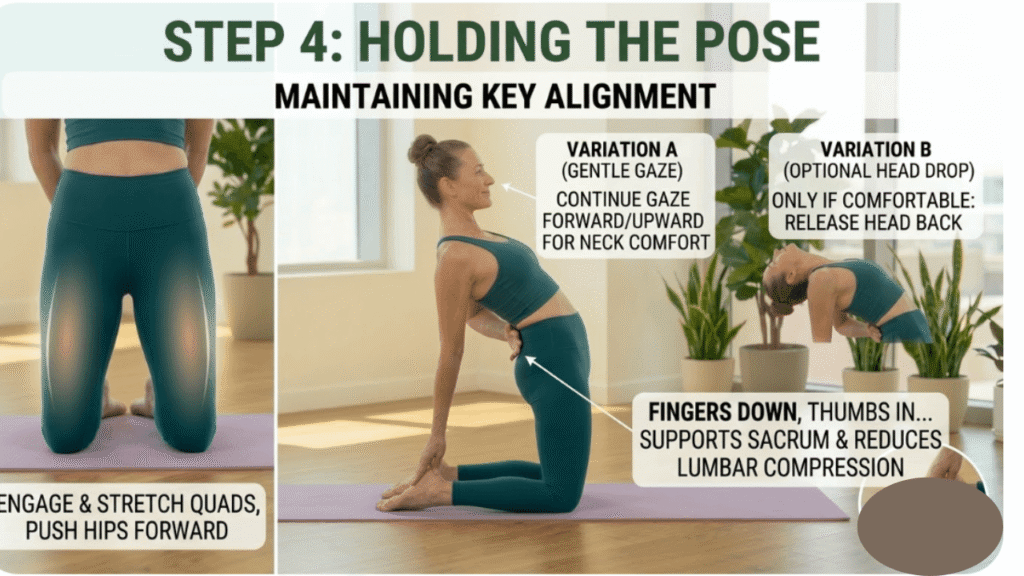
This is the most critical step for preventing back pain. Position your hands on your lumbar region to provide stability, ensuring your fingers face the mat. Imagine your thumbs are pointing in toward your spine. This position allows you to gently use your hands to encourage your tailbone to lengthen down toward the floor.
Inhale deeply and imagine a string attached to your sternum, pulling your heart directly up toward the ceiling. This action creates space in your lower spine before you even start the backbend. It is the number one secret to learning how to do Camel Pose safely.

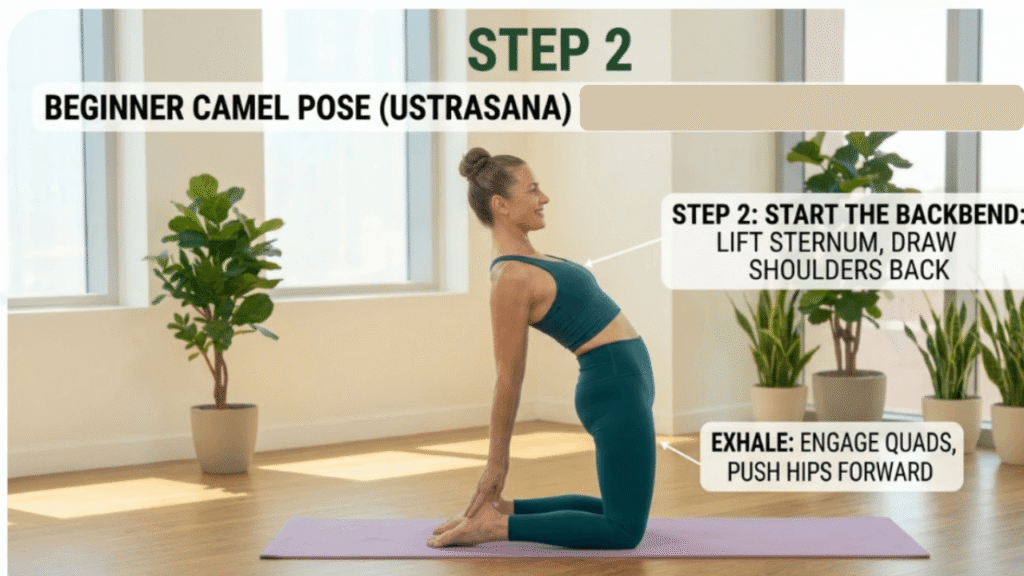
Step 2: Start the Backbend (Beginner Variation)
As you exhale, keep your sternum lifted, your shoulders drawn back and your quadriceps well stretched. Push your hips forward to maintain that crucial foundation.
Gently begin to lean back, starting from your upper spine. Ensure your hands remain on your lower back to maintain support. For many beginners, staying in this variation is perfect. You will still experience a beautiful opening in your chest and shoulders without putting any pressure on your lower spine.
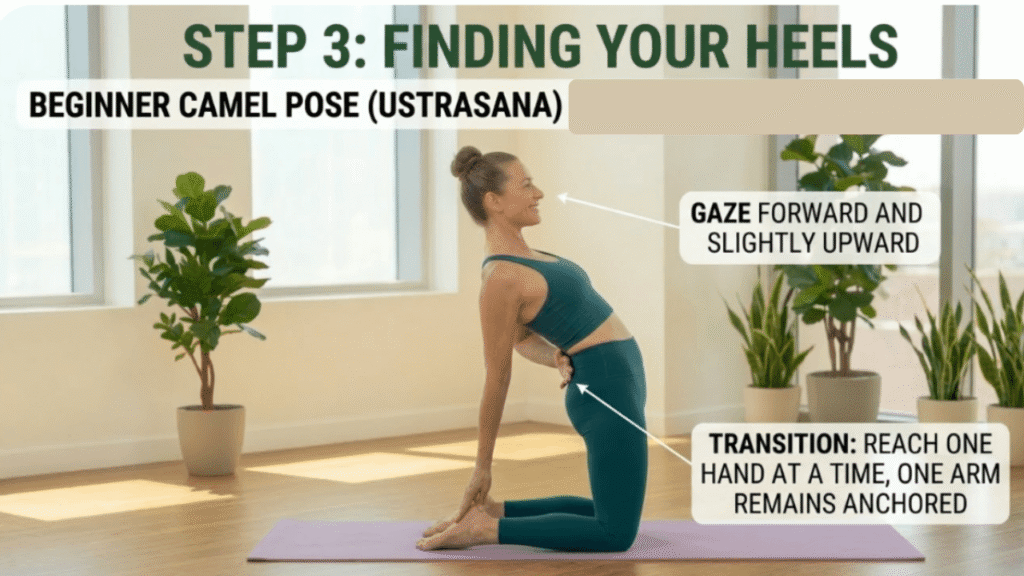
Step 3: Finding Your Heels (Progressive Variation)
If you feel stable and pain free, you can try reaching back for your heels. This should be done one hand at a time. Direct your vision straight ahead or tilt your gaze slightly upwards.
If your heels are not within comfortable reach, do not strain or collapse. This is where yoga blocks are a total game changer. Place a block on its highest setting on the outside of each foot. Rest your hands on the blocks instead of your heels. This modification allows you to experience the full benefits of the pose while keeping your lower back perfectly safe.
Step 4: Holding the Pose
Once you have found a comfortable depth, ensure you are not dumping your weight into your lower back. Continue to push your hips forward and keep your chest lifting high. Keep your gaze gentle. You may choose to release your head back only if it feels comfortable for your neck.
Breathe deeply here for 2 to 6 breaths. Ustrasana is not just a physical stretch, regular practice calms the mind and helps release accumulated stress.
The Safe Release and Neutralization
How you come out of Camel Pose is just as important as how you go into it.
To release, inhale, lead with your heart and use your core strength to bring your torso back up. Lead with your sternum rather than your chin to keep your neck safe.
Immediately sit back on your heels in a kneeling position.
Crucial Counter Pose:
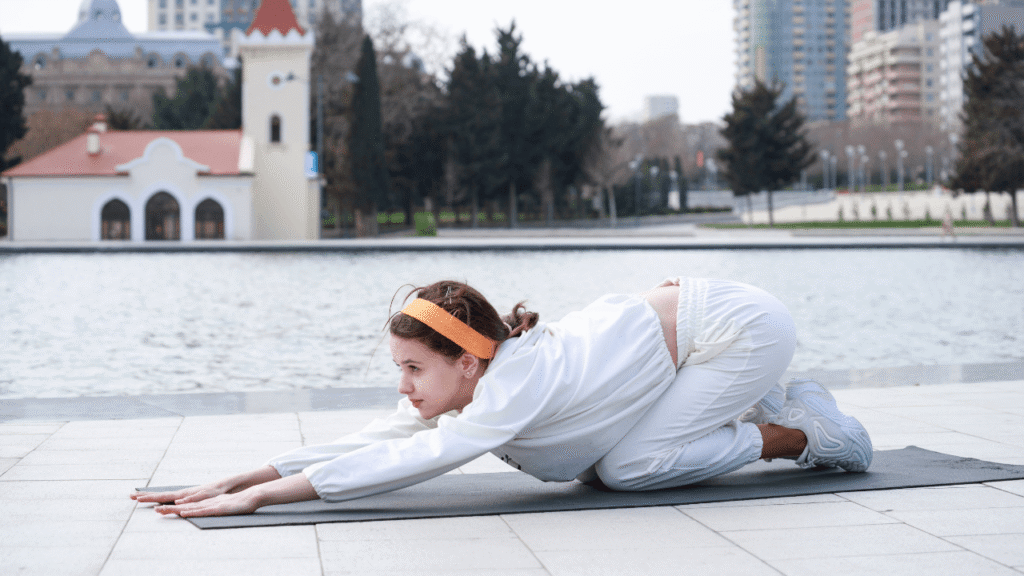
Always follow Camel Pose with Child’s Pose (Balasana). This gentle forward fold is the perfect counter stretch, allowing your spine to neutralize and release any tension. Spend at least 5 deep breaths in Child’s Pose before moving on.
Conclusion
You now have a complete, safe and effective guide on how to do Camel Pose. By prioritizing spinal length, using modifications like yoga blocks and blankets and always listening to your body, you can unlock the transformative benefits of this powerful backbend.
Ustrasana is a pose of openness and courage, with consistent and mindful practice, you will not only build confidence on your mat but in yourself, too.
(FAQs) about How to Do Camel Pose: 4 steps (Ustrasana) for Beginners Without Back Pain
1. What is the proper way to enter and exit Camel Pose safely?
Always start from a kneeling position, building a strong foundation. Place your hands on your lower back, draw your elbows together and inhale to lift your heart up before you lean back. Lead with your upper back (thoracic spine) rather than just bending from your lumbar spine. To exit, inhale, use your core and lead with your sternum to bring your torso back up. Lead with your heart rather than your chin to protect your neck. Immediately sit back on your heels in a kneeling position and relax.
2. How can I do Camel Pose without putting stress on my lower back?
This is the most common concern. The key to a pain free Camel Pose is length. Before you lean back, use your hands on your lower back to gently encourage your tailbone to lengthen down. Inhale deeply and imagine your chest being pulled directly up toward the ceiling, creating space between each vertebra. When you move back, initiate the backbend from your upper and middle back, keeping your hips pushed forward. Never “dump” your weight into your lower spine. If your back still pinches, do not go as deep. Keep your hands on your back or use yoga blocks.
3. Are there modifications for beginners who find Camel Pose challenging?
Absolutely! In fact, modifications are essential for beginners learning how to do Camel Pose safely.
Toe Tucks: Tucking your toes under lifts your heels, making them much easier to reach and significantly reducing the depth of the backbend.
Hands on Back: You can keep your hands on your lower back (fingers pointing down) the entire time, focusing solely on lifting your chest. This is a beautiful and effective variation.
Yoga Blocks: Place blocks on their highest setting on the outside of each ankle. Rest your hands on the blocks instead of your heels to bring the floor to you and prevent lower back compression.
4. Can Camel Pose cause dizziness and what should I do if it does?
Yes, it is common to feel slightly dizzy or lightheaded in or after Camel Pose. This can be due to a change in blood flow or a release of tension. To manage this:
Keep your gaze forward or slightly upward rather than dropping your head back completely.
Breathe deeply and evenly. Never hold your breath.Exit the pose slowly and immediately rest in Child’s Pose to allow your body to stabilize.
5. Is Camel Pose suitable for everyone or are there contraindications?
While it is a beneficial pose, Ustrasana is not suitable for everyone. Avoid or consult a doctor before attempting it if you have:
Severe back or neck injuries (especially disk issues).
High or low blood pressure.
Migraines or insomnia.
A heart condition.
You have reached the second or third trimester of your pregnancy.
6. Does Camel Pose help improve posture and relieve back pain over time?
Yes, consistent and mindful practice of Camel Pose can significantly improve posture and relieve chronic back pain. By stretching the entire front of the body (chest, shoulders, abdomen) and strengthening the back muscles, it counteracts the “hunching” caused by sitting.
However, if practiced incorrectly (collapsing into the lower back), it can cause pain. Learning how to do Camel Pose with proper alignment is key.
7. Is it normal to feel a deep stretch in the front body during Camel Pose?
Yes, a profound stretch in the entire front body is one of the primary physical benefits and physical benefits of Ustrasana. You will feel it across your chest, in the front of your shoulders, your throat (if dropping your head), your abdomen and deeply into your quadriceps (front thighs) and deep hip flexors. It should be a strong “good hurt” stretch, not a sharp, pinching pain.
8. Can Camel Pose have an impact on emotional release or confidence?
Yes, Ustrasana is known as a potent heart opener in the yogic tradition. This can lead to an emotional release, which may manifest as a sudden feeling of vulnerability, joy or even tearfulness. This is a normal and healthy part of the practice. Physically opening the chest and standing/kneeling tall also improves confidence physiologically as well as psychologically and helps condition the mind to believe in yourself, which translates to building the confidence to face life challenges bravely.
9. Should I tuck my toes under or keep the tops of my feet on the mat in Camel Pose?
Both are correct and offer different benefits:
Toes Tucked Under: This variation lifts your heels, making them much easier to reach. It is ideal for beginners or anyone with limited flexibility in the front of their body, as it makes the pose more accessible and prevents lower back strain.
Tops of Feet on the Mat: This is the full version of the pose. It requires significantly more flexibility in the quads, hips and chest to reach the heels. It also deepens the backbend, which requires stronger back muscles and core engagement for safety. It is an advanced variation of how to do Camel Pose.
10. What is a counter pose to Camel Pose and why is it important to practice one?
A counter pose is essential after a deep backbend like Camel Pose to neutralize the spine and release tension. The Child’s Pose (Balasana) is the perfect, indispensable counter pose. This gentle forward fold allows the entire back (lumbar, thoracic and cervical spine) to round and lengthen, releasing any compression or tightness created by the intense backbend. Sit back on your heels immediately and relax.