Core of Steel: The Best Yoga Poses for a Toned Belly (No Sit-ups Required)
For decades, we were told that the only way to get a flat stomach was to do hundreds of sit-ups every day. But here is the problem, sit-ups often strain your neck and pull on your lower back, leading to more pain than progress.
To get a Core of Steel, you need to train your muscles to work together as a single unit. Instead of “crunching” the surface muscles, yoga targets the Transverse Abdominis the deep, corset like muscles that actually pull your belly in and protect your spine.
Table of Contents
Introduction
To get that “Core of Steel,” it is essential to understand that your abdominal muscles are not just for show they are the powerhouse of your entire body.Today we have moved beyond the era of painful, repetitive crunches that often do more harm to the neck and spine than good for the belly.
Instead, the modern approach focuses on functional stability. This means using simple stretches for core strength to engage the deep, internal muscles that wrap around your body like a natural corset. By mastering these three yoga based movements, you will not only tone your midsection but also improve your posture and eliminate lower back pain.
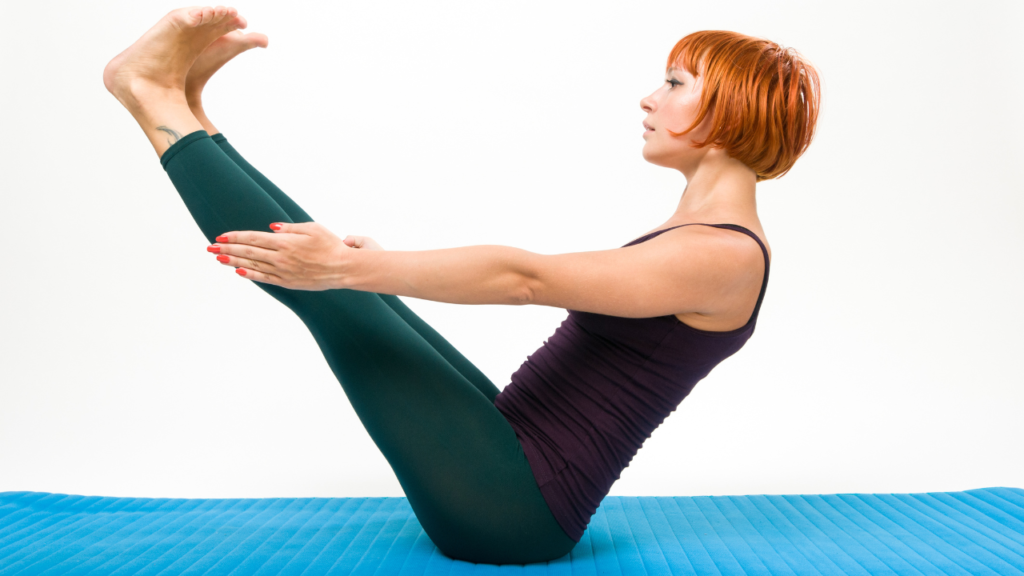
1. Navasana (Boat Pose): The Ultimate Deep Core Engagement
Boat Pose is a powerhouse move because it requires balance, hip flexor strength and intense abdominal contraction all at once. Unlike a sit-up, which uses momentum, Boat Pose requires “static hold” strength, which builds muscle endurance.
Step-by-Step Execution:
Find Your Foundation: Start by sitting on your yoga mat with your knees bent and feet flat on the floor. Place your hands behind your hips for support.
The Lift: Lean back slightly, keeping your spine long and straight (do not hunch!). Lift your feet off the floor until your shins are parallel to the mat. This is the “Half Boat.”
The Extension: If you feel stable, extend your arms forward alongside your legs, palms facing inward. For an extra challenge, slowly straighten your legs until your body forms a “V” shape.
The Breath: Hold this for 5 to 10 deep breaths. Focus on pulling your belly button in toward your spine to keep your lower back from arching.
Detailed Benefit: This pose targets the Rectus Abdominis (the “six-pack” muscles) and the Transverse Abdominis (the deep core). It also strengthens the hip flexors and the muscles of the spine, which are often weak in people who sit at desks.
2. Phalakasana (The Plank): Building Full-Body Stability
The Plank is the gold standard for core training. It is an isometric exercise, meaning the muscles are working hard to hold a position without moving. This is the most effective way to train your core to protect your spine during daily activities.
Step-by-Step Execution:
Set the Base: Start on all fours with your wrists directly under your shoulders.
The Alignment: Step your feet back one at a time. Your body should form one straight line from the crown of your head down to your heels.
The Lockdown: Engage your thighs and squeeze your glutes. This prevents your hips from sagging, which is the most common mistake. Imagine pulling your elbows toward your toes (without actually moving them) to fire up your upper abs.
The Gaze: Look at the floor about 6 inches in front of your hands to keep your neck in a neutral, pain free position.
Detailed Benefit: The Plank is a total core move. It builds the “bracing” strength needed for heavy lifting and better posture. It also tones the shoulders and glutes, making it a highly efficient calorie burner.

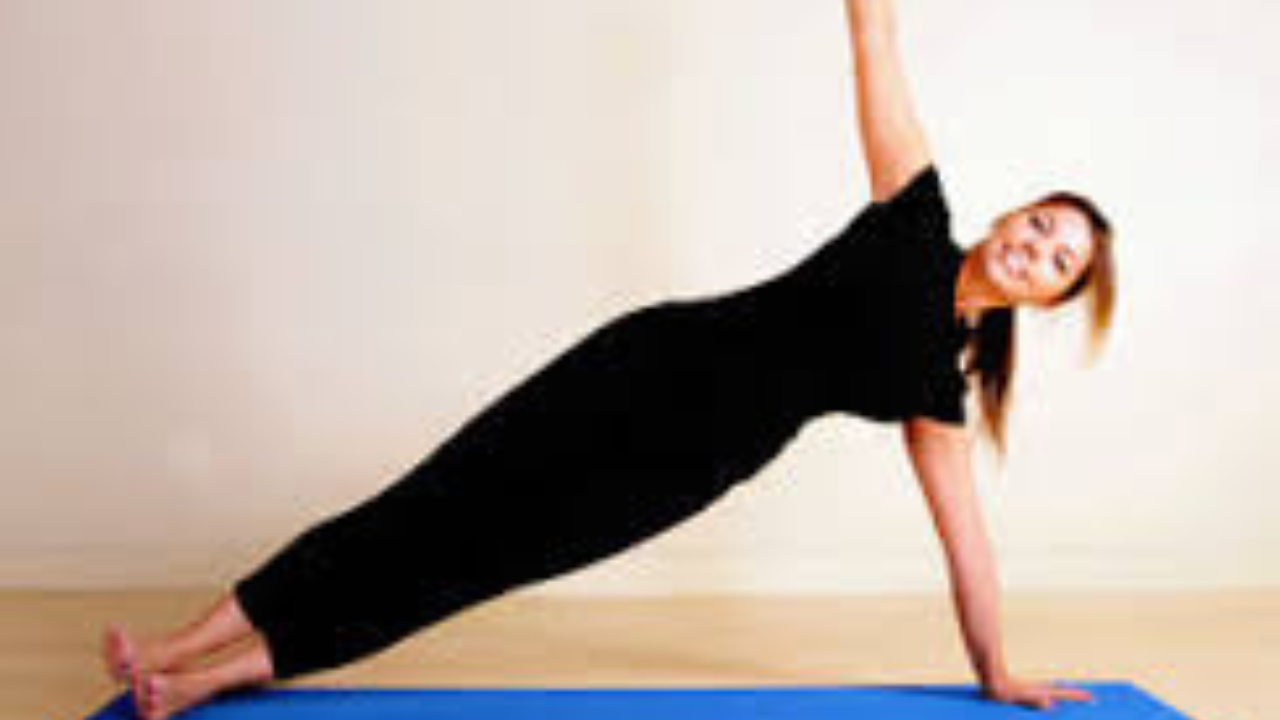
3. Vasisthasana (Side Plank): Sculpting the Obliques
To get a truly toned belly, you cannot ignore the sides of your waist. The Side Plank targets the oblique muscles, which are responsible for twisting and side bending.
Step-by-Step Execution:
The Pivot: From a standard Plank position, shift your weight onto your right hand and roll onto the outer edge of your right foot.
The Stack: Stack your left foot directly on top of your right. If this is too difficult, you can place your left foot in front of your right for a wider base.
The Reach: Extend your left arm straight up toward the ceiling. Keep your head in line with your spine.
The Lift: The most important part is to push your hips toward the sky. Do not let your bottom hip dip toward the mat. Hold for 30 seconds, then switch sides.
Detailed Benefit: This exercise focuses on the Internal and External Obliques. Strong obliques create a tapered waistline and are the primary muscles that protect your lower back from twisting injuries.
Conclusion
Building a Core of Steel is a journey of quality over quantity. You do not need to perform hundreds of repetitions to see a transformation. By practicing these simple stretches for core strength, you are investing in a body that is as strong as it is toned.
Yoga teaches us that true power comes from the center. When you strengthen your core, you move with more grace, sit with better posture and carry yourself with more confidence. Remember, the goal is not just a toned belly it is a functional, resilient body that supports you in every aspect of your life. Roll out your mat, breathe through the “shake” and let these poses redefine what your core can do.
FAQs About Core of Steel: The Best Yoga Poses for a Toned Belly (No Sit-ups Required)
1. How long does it take to see results with yoga for abs?
With a clean diet and practicing 3–4 times a week, most people feel more core “tightness” in 2 weeks and see visible toning in 4–6 weeks.
2. Is yoga better than crunches?
Yes. Yoga works the deep internal muscles (Transverse Abdominis) and the back, whereas crunches mostly hit the “six-pack” surface muscles and can strain the neck.
3. I have a back injury; can I still do these?
Yoga is often recommended for back pain, but you must move slowly. Always consult a doctor first and skip any pose that causes sharp pain.
4. Do I need to be flexible to do Boat Pose?
No! You can keep your knees bent. The core engagement is exactly the same whether your legs are straight or bent.
5. How many times a day should I do these?
Once a day is plenty. Your muscles need time to recover to grow stronger.
6. Will these poses help me lose weight?
Yoga helps tone muscles, but “belly fat” is lost through a combination of a healthy diet and calorie burning activities.
7. Can I do these on my bed?
It is better to use a firm surface like a yoga mat on the floor. Beds are too soft and can cause you to lose your alignment.
8. What if my wrists hurt during Plank?
You can do a “Forearm Plank” by resting on your elbows instead of your hands. It is just as effective for your abs!
9. Why do I shake during Boat Pose?
Shaking is good! It means your nervous system is working hard to recruit new muscle fibers. It is a sign of progress.
10. Is "Side Plank" safe for beginners?
Yes. If it is too hard, drop your bottom knee to the floor for extra support while you build your strength.